
Indonesia: First Hand Cruiser’s Report on the e-Visa System
After nearly 10 years cruising South East Asia, with five forays into Indonesia, well known cruisers Sherry and Dave McCampbell say the only thing that stays the same with Indonesian formalities is that they constantly change. One particular area is the A211 e-visa. Here Sherry outlines the process they followed to secure the visa in May 2024.
Published 3 months ago
The only thing constant is change
It IS possible to apply for and receive the Indonesian 211A e-visa by yourself and not through an agent (as of May 2024). The process that we have experienced is as follows. However, please read this whole article first carefully before you start! (especially the part about applying early!). Details, quirks and workarounds are outlined below.
The e-visa website is similar to the Indonesian Customs’ Vessel Declaration website in that it’s very quirky and buggy! We tried in February 2024 to apply ourselves, after a friend indicated they had been successful. But finally gave up and hired an agent to get the visa for us, because we were running out of time.
Having an agent do the visa costs $100-$150 USD per passport, over and above the $100 USD cost of the visa to the Indonesian government. Plus once you use an agent to get the visa, you have to use that agent to extend the visa, and that isn’t free either.
Step 1: Create an account
Start at https://molina.imigrasi.go.id/ (I believe https://evisa.imigrasi.go.id/ will get you to the same place) and CREATE AN ACCOUNT FIRST.
Then go in and start an application and select the 60 day tourist visa.
The first step to create an account is to upload a carefully scanned or photographed copy of your passport. This must be a high quality copy as a JPG. This is the step that causes the most problems and you have to do it twice (creating an account and creating a visa application). The website would not accept the upload of the passport. I never did resolve why, or exactly how to get around this problem when it occurs, except to keep trying. Try with different browsers, try different times during the day, maybe clear the cache on your browser, maybe even try someone else’s computer. It seemed random (and not the fault of the passport jpg) when it would work and when it wouldn’t.
Step 2: Upload a photo
Second, you have to upload a color passport-type photo of yourself. File format using *.JPEG/ .JPG/ .PNG in color. Min. 400 x 600px. Max. size 2Mb. Proper composition as a normal passport photo. We just put on nice clothes, stood up against a white wall and took a picture with our cell phone, and then cropped it to look like a passport photo (there is an example of what they are expecting on the upload page). Then there’s the usual information to enter about your natioinality, date of birth, and passport.
Step 3: Your email address
Next, enter an email address. This will be your User ID for the account and will be how they communicate with you. So pick an email address that is not likely to reject emails from Indonesia (some email servers are much pickier than others)—Gmail worked for us. The website checks right then to make sure that the email address has not been used before.
One problem we ran into early on, was that as part of creating an account, the website sends a confirming email to your email address, and you need to click on the link in that email to actually create the account. The problem we had in February was that we didn’t get any confirming email (some part of the website process on their end was not working).
But, the website did remember that we had tried to create an account with that email address and would not let us try again with the same email address. It was frustrating and the only work around was to use a different email address. We were quickly running out of email addresses to use (see workaround below). A few days later we were able to create an account and get the email confirmation.
Step 4: Apply for the visa
Once you have created an account successfully, then log on and apply for the visa. There is an initial entry screen and these are the answers you should give:
- Passport: Your nationality
- Main Purpose: General, Family or Social
- Sub Purpose: Tourism, Family Visit and Transit
- Choose Visa: Tourist Single Entry Visit Visa for 60 days
- Planning to Stay: 60 Days
Preparation:
To apply for the visa without an agent to guarantee you, you will also need three months worth of bank statements showing a balance of (I forget how much, I think $2,000 USD or equivalent). Be sure to blank out your account numbers before uploading. I used a program I bought long ago called CutePDF to merge three months worth of PDF statements in to one file and to XXX out the account numbers (I don’t know if they allow for uploading three separate files, maybe they do).
You will also need to supply an address in Indonesia. “On my Boat” doesn’t work. I used a friend’s address (after asking permission). I think a marina address, or maybe even a hotel address would work fine. So figure out what you are going to use before you start the application process.
Upload your Passport:
The first step is again to upload a copy of your passport. This is where I ran into trouble in both attempts to apply. The SAME passport upload that I used to create the account wasn’t accepted when I had to upload it again to apply for a visa. I tried a bunch of different stuff, same passport but different file name, different sizes from very small file to a high resolution jpg. Tried using a photo of my passport carefully taken with a cell phone, as well as a high resolution scan with a scanner. Nothing I did worked. This is when I gave up and hired an agent in February. In May, I happened to be in the USA and I happened to be applying at 1am Jakarta time and it worked the first time.
If at first you don’t succeed….keep trying:
I am suspicious that they may have a number of applications per day cut-off and rather than telling you that, they just quit accepting applications with a stupid error. Or their hard drive fills up, or… who knows? So if nothing else works, try very early in the morning. Keep trying.
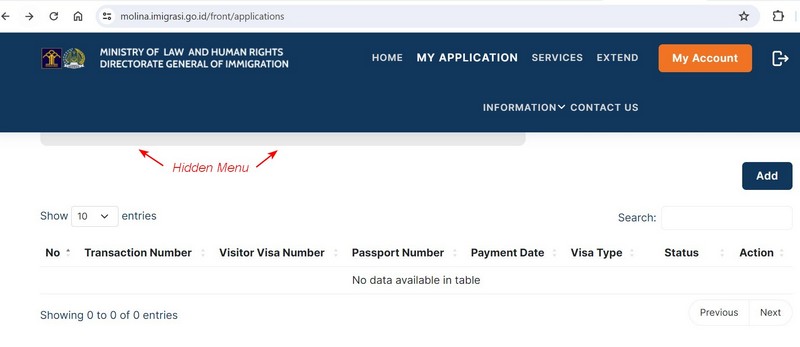
The next stumbling block was a sneaky one. I didn’t realize it at the time, but part of the web page was not visible on my screen. My application screen, after submitting my application looked like the following:
Paying for the visa:
After getting to the “submit” part, the Transaction list was empty and I had submitted without paying for the visa. How do I pay for the visa?? None of the visible menu items, including “My Application” would show my application.
There are, I believe, two ways.
1. They send you a confirmation email after you submit. In that email is a button to click that will take you to your submission and there you can click on a link to go to the payment website.
This is what I did.
2. If your Application List is empty, as mine was (see picture above), figure out how to “zoom out” on your browser. In Chrome on Windows, there’s a Zoom function in the settings menu (three little vertical dots on the far right end of the menu bar). Apparently with 100% zoom on my laptop, the black bar on the top of the page covers up a critical menu that allows you to click and show your “batch” status. Zooming out, I found out later, reveals the previously hidden menu item as shown below:
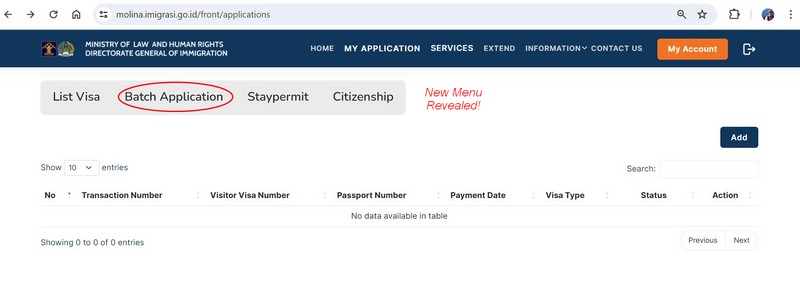
Click on the Batch Application menu and the visa application shows up.
I believe one of the clickable things in a visa you have not yet paid for, will get you to your specific payment page on Finpay.com
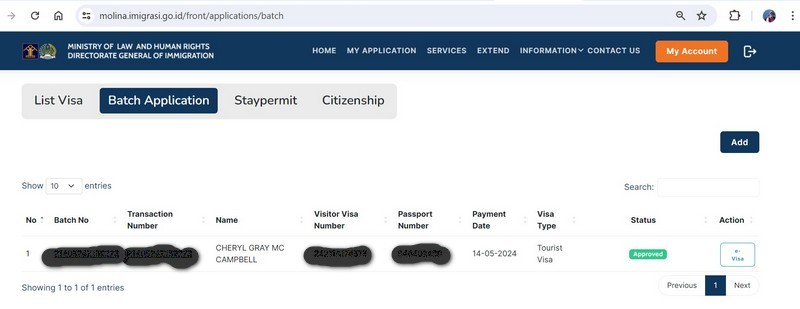
I used a US credit card and it worked fine. I got payment confirmation from Finpay.com, their payment processor, in my email.
Step 5: Receiving the Visa
Seven calendar days later, I received an email from Immigration with my visa as a PDF, which I printed to take with me. (The airline check-in agent wanted to see it).
Once issued, the visa is good for 90 days, meaning that you have 90 days to enter Indonesia with that visa. Then, when you enter, you get 60 days from the date you enter—at a port, on entry, they stamp your passport with the end date and remember it’s 60 days, not 2 months!
On arrival at the airport in Jakarta (I was flying back in after a short visit home), nobody was there to look at my passport or the visa printout. I put my passport in an automated scanner and got the green light, the gate opened and I walked through to Customs. No stamp in passport, but a Visit Stay Permit (PDF) was emailed to me automatically by Immigration. This, I assume, takes the place of the stamp in my passport. It has the date of arrival and the end date of the current 60 day visa. My cost was just the government cost of the visa…1,500,000 IDR (about $100 USD). No agent fee.
Extending the Visa
I have not tried to extend one of these Do-It-Yourself 211A visas, but theoretically it should be possible, ONLINE, on the same website/account.
Additional Tips:
- If you run out of email addresses before you get your account activated and you have a gmail account, there’s a geeky work-around. You can put a period (dot) (.) anywhere in your Gmail address (besides in the gmail.com part) and most websites think it is a different email address, but Gmail ignores the dot (so, to the Immigration website, joe.blow@gmail.com is a different account to joeblow@gmail.com. But to Gmail, they both come into the same account.)
- Make sure that you start trying to apply for the visa well in advance of your arrival. If you wait until the last minute and then decide to use an agent because you can’t manage to complete the process yourself, the agent will charge you an expedite fee on top of their agent fee.
- I would not leave for Indonesia without having the visa in my hot little hand. I have not yet heard of anyone getting denied, but I have heard of some approvals taking longer than seven days.
- The visa that I received is labeled 211A–this is the old name for the extendable-up-to-6-months tourist visa. There is no longer any mention of a 211A visa on the Immigration website anywhere. I believe the closest thing that is listed is the C1 visa, but I am not sure they are identical. When you apply, it is not labeled C1 OR 211A. Another quirk.
Using an Agent can be Advantageous
It IS advantageous to have an agent, besides just making it easier to apply for a visa. As your situation changes, or as laws change in Indonesia, it’s nice to have someone to go to, to ask for advice.
Note that these agents DO NOT help you check in to the country. They are just there to help you get your visa and assist you with any immigration issues while you are in Indonesia. (The exception is Raymond Lesmana, if you are on a rally organized by Raymond, then assistance in clearing in is included in the overall cost). An agent was absolutely invaluable to have in your pocket during Covid when everything went sideways.
Recommended agents, if you need/want one, with Whatsapp numbers:
- Ruth at Isle Marine: +62 812-384-7850 ruth@islemarine.com
- Hellen Delima: +62 813-4304-3600 hellen_ambon@yahoo.com
- Raymond Lesmana: +62 811-124-574 raymondlesmana@ymail.com
There are many others, but these are the three most recommended on the Sail SE Asia Facebook group. Be sure to confirm the cost for an initial visa and the cost for a visa extension (every 60 days).
Conclusion
After nearly 10 years cruising SE Asia, with five forays into Indonesia, what we can say is that the only thing that stays the same with Indonesian formalities is that they are constantly changing.
Good luck, and enjoy Indonesia, it truly is magical!
Sherry & Dave McCampbell
s/v Soggy Paws
……………………..
About the Authors:
Dave McCampbell is a retired US Naval Diving and Salvage officer with over 40 years cruising and eight sailboats-worth of maintenance experience. Sherry is a retired computer programmer and is currently the navigator on their St Francis 44 catamaran, s/v Soggy Paws. The McCampbells have voyaged nearly 40,000 miles from their home in Florida and are currently cruising in SE Asia. Their blog is an incredible resource for cruising sailors with countless free cruising guides which they work very hard to keep up to date, and other useful resources.
……………………..
Related Links:
……………………..
The opinions expressed in this article are the author’s own and do not reflect the view of Noonsite.com or World Cruising Club.
………………………
Find out all news, reports, links and comments posted on Noonsite, plus cruising information from around the world, by subscribing to our FREE monthly newsletter. Go to https://www.noonsite.com/newsletter/.
Related to following destinations: Ambon (Yos Sudarso Port), Banda Neira, Bandar Bintan Telani (BBT) - Bintan Island, Banjarmasin, Banyuwangi, Batu Ampar, Bau Bau, Benoa, Biak, Bitung, Cilacap, Eastern Indonesia - Banda Islands, Eastern Indonesia - Halmahera, Eastern Indonesia - Kai Islands, Eastern Indonesia - Papua, Eastern Indonesia - Seram and Ambon, Eastern Indonesia - Tanimbar Islands, Eastern Indonesia - Timor, Gili Gede Island, Indonesia, Jayapura, Kai (Kei) Islands, Kumai, Kupang, Kwandang / Saronde Island, Labuhan Bajo, Lahewa (Nias), Lembar Harbour, Lingkas (Tarakan), Lovina, Manado, Maumere, Maurole, Medan (Belawan), Medana Bay, Morotai, Nongsa Point Marina, North / Central Indonesia - Kalimantan, North / Central Indonesia - Sulawesi, Nunukan, Padang, Padang Bai, Pemangkat, Pontianak, Raja Ampat Islands, Sabang (Pulau We), Samarinda, Sekupang, Sorong, South / Central Indonesia - Bali, South / Central Indonesia - Flores, South / Central Indonesia - Lombok, Sungai Manggar, Tahuna (Sangihe Islands), Tanimbar Islands, Tanjung Emas (Semarang), Tanjung Perak (Surabaya), Tanjungpinang (Bintan Island and Riau Islands), Tarempa - Siantan (Anambas Islands), Ternate, Tolitoli, Ujung Padang, Western Indonesia - Batam Island, Western Indonesia - Bintan/Lingga/Riau and Anambas Islands, Western Indonesia - Java, Western Indonesia - Sumatra
Related to the following Cruising Resources: Circumnavigation, Cruising Information, Documents, Planning and Preparation, Routing

This was super helpful. A few additional notes… Before you start, make sure you have an address in Indonesia to use as the online form requires the address of “where you will stay”. When entering the address fill in the postal code first and most of the other address fields, including immigration office, will auto fill. The other hiccup is (when I filled out the online form) a requirement for a return ticket. Despite a comment on the form that it is not required for free on a boat, the electronic form could not be submitted without uploading a “return ticket”. I uploaded a letter stating I intend to arrive and depart by private yacht and included a copy of the boat’s registration.